
Table of Contents
Establishing remote connections has revolutionized the way network infrastructure is managed, with the introduction of the “Telnet” protocol back in 1969 it was the first ever network protocol that enabled users to establish connections to remote servers and other network devices. But times changed as the need for securing communication over the internet increased rapidly.
But what does Telnet have to do with it? Telnet is a protocol that is operated on TCP Port 23 and like most protocols it uses the client-server mechanism to establish communications with devices, but later one of its loopholes led to the rise of SSH Protocol, that is sending the instructions or commands in “plain text” that raised concerns among tech giants and security researchers. So how is SSH different?
Introduction to SSH!
The Secure Shell, commonly known as the SSH Protocol, operates on TCP Port 22. This protocol’s biggest feature is that it serves the same purpose as Telnet but encrypts the communication between a Client and a Server. Introduced back in 1995, Secure Shell has evolved over time, with SSH-2 currently being the standardized version, which SSH-1 once preceded.
Implementing Secure Shell on a Cisco Switch
As we understood why Secure Shell is being used for remote connections let us just understand its implementation on a CISCO SWITCH in just 6 simple steps
STEP 1: Checking if a CISCO switch supports encryption
Not every switch may support encryption as it depends on the version of the IOS (“Internetworking Operating System”, a Cisco-specific OS for all their network devices). To check whether a CISCO switch supports encryption you can just run the command “show version”
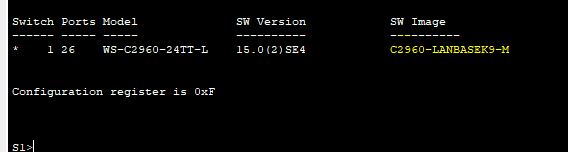
All the Cisco IOS filenames containing the string “K9″ support cryptographic features, hence if your switch has one in its filename it supports SSH. If found it’s also recommended to check if SSH is already enabled using the “show ip ssh” command. As we can observe the SSH is currently disabled on the switch.

STEP 2: Configuring a Domain Name
It’s important to set a domain name for your device, it’s necessary for setting up remote connection services and security certificates. The domain name is used to identify the device, for example, if my switch is named “s1″ it is identified as “s1.thedefenderz.io”.
You can do that by simply running the command “ip domain-name yourdomainname” in global configuration mode.

STEP 3: Generating RSA Key Pairs
Generating RSA key pairs automatically enables Secure Shell on the device, but why? SSH works on public key cryptography for encryption, as RSA uses asymmetric cryptography it generates both a public key and a private key, and because we generate these keys for configuring the device it automatically invokes the SSH server on the device.

When you run the command “crypto key generate rsa” the device will prompt you to enter bits in the modulus, this is basically asking for the length of the cryptographic key. 512 bits being the base minimum value it’s rarely used because of security concerns we can always go with “1024,2048 & 5096″ the higher the length the stronger it is but also impacts the performance negatively.
STEP 4: Configuring user authentication
Just like implementing user authentication for other services on Cisco devices, you can implement Secure Shell service by using the command “username your-user-name secret your-password” where “username” and “secret” are the keywords.

STEP 5: Configuring VTY lines
The Virtual TeleType line or VTY lines in Cisco refers to virtual lines that can be used for setting up remote connections to a Cisco device, they allow users to enable remote connections and hence necessary to secure them. We can simply do it by running the following commands in global configuration mode.
- line vty 0 15: telling how many VTY lines are configured for remote connection
- transport input ssh: “transport input” telling the type of connections and “ssh” specifying Secure Shell type connections
- login local: specifying that authentication will be made based on locally created users (what we did in STEP 4)
- exit: exiting the line configuration mode

STEP 6: Enabling SSH Version 2
using the command “ip ssh version 2“, here ip specifies that configuration is made only for ip based services and “ssh version 2″ specifies Secure Shell version 2 service.
Conclusion
With this, we can secure remote connections for Cisco devices and the steps can be followed for any Cisco device supporting Secure Shell or cryptographic techniques. You can always check if the SSH is implemented or working by running the command “show ip ssh”.

Read out our other articles: 6 Powerful XSS Techniques That Will Blow Your Mind!
[…] Securing Remote Connections Using SSH: A 6 step guide for Cisco Routers […]